AutoQAI documentation
AutoQAI lets an AI coding agent drive the browser tab you already have open and signed into. This guide walks through installing the MCP server and the extension, registering AutoQAI with your agent, pairing a tab, configuring a project, and running your first tests.
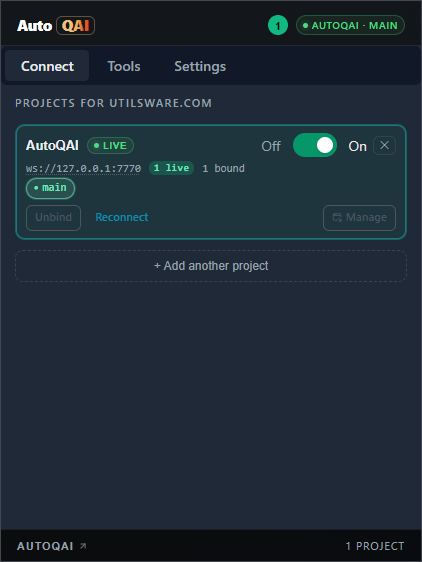
@autoqai/mcp package and add the browser extension. Installing the package registers AutoQAI with your AI clients for you, so just open your project in your agent — it starts the AutoQAI server on its own. Then open the extension popover, pick your project under Discovered projects, paste the pairing token once, and bind the tab you want to test. No flags, no ports to type.autoqai in your project to open a guided menu that registers clients, pairs the extension, and lists your projects — handy when you want to pair a tab before starting your agent. Either path lands in the same place.AutoQAI is two parts that work together: the MCP server (an npm package that runs locally inside your project) and a browser extension. Your AI agent connects to the server using the Model Context Protocol; the server relays each instruction to the extension, which executes it against your tab.
How it works
The agent never launches a browser. Instead, three pieces cooperate over a private loopback connection that never leaves your machine:
AI CLI Agent
Claude Code, Cursor, GitHub Copilot, Kiro, Visual Studio, or a JetBrains IDE. It talks to AutoQAI over the Model Context Protocol and decides what to test and how.
AutoQAI MCP Server
A small Node process started inside your project. It exposes testing capabilities to the agent and bridges them to your browser over a private loopback connection.
Browser Extension
Pairs with the server and runs each instruction against the tab you bound — your real, authenticated session — using the browser's own DevTools protocol.
Because the extension acts inside your existing tab, your cookies, SSO session, and feature flags stay exactly as they are — the agent tests the real application the way you actually use it.
Requirements
- Node.js 22 or newer — the MCP server is published as an ESM package and runs on your machine.
- A Chromium-based browser — Google Chrome (and other Chromium browsers) are supported through the extension.
- An MCP-capable AI agent — Claude Code, Cursor, GitHub Copilot (agent mode in VS Code), or Kiro.
- A project folder — AutoQAI keeps per-project state in a local .autoqai directory, so run it from your repository root.
Install the MCP server
The server ships as the @autoqai/mcp package and exposes an autoqai command. Installing it globally is the simplest option:
npm install -g @autoqai/mcpConfirm it installed correctly:
autoqai --versionautoqai init (see Register with your agent).The package is published on npm: @autoqai/mcp.
# Pin a specific version (use this when the Chrome Web Store
# review is still rolling out and the latest MCP is ahead of
# the extension version you currently have installed)
npm install -g @autoqai/mcp@0.1.0
Install the browser extension
The extension is what actually drives your tab. Install it from the Chrome Web Store:
- Open the Chrome Web Store listing and click Add to Chrome.
- Pin the AutoQAI icon to your toolbar so the pairing popover is one click away.
- When you later bind a tab, Chrome shows its standard "is being debugged" banner — that's expected and confirms the tab is connected. Leave it in place while testing.
autoqai from a terminal), then open the extension popover. Your project appears under Discovered projects — click it and paste the pairing token once. No ports to type.Register AutoQAI with your agent
AutoQAI can write its own MCP registration into your agent's config. Run the init command and it detects supported clients and adds the server entry:
autoqai initYou can also target specific clients or preview the changes first:
# Register with a specific client
autoqai init --client claude-code

# Register with several at once
autoqai init --client claude-code --client cursor

# Supported client ids:
# claude-code, cursor, vscode, copilot, kiro, visualstudio

# Write project-scoped config instead of user-scoped
autoqai init --project

# Preview the changes without writing anything
autoqai init --dry-run
Per-client setup commands
Pick your agent below for the exact command and the manual config if you'd rather edit the file yourself.
Anthropic's CLI agent
autoqai init --client claude-codeOr configure it manually. Add the entry below to ~/.claude.json (or ./.mcp.json for a single project) under the mcpServers key:
{
  "mcpServers": {
    "autoqai": {
      "command": "autoqai"
    }
  }
}
Claude Code picks up the server on the next launch in the project directory. Confirm it is connected with /mcp.
Once registered, most agents start the autoqai server automatically when you open the project.
Uninstall
To stop an agent from loading AutoQAI, run the uninstall command — the exact reverse of autoqai init. With no arguments it removes the registration from every supported client at user scope:
autoqai uninstallYou can target specific clients, scope it to a project, or preview the changes first:
# Remove from a specific client
autoqai uninstall --client claude-code

# Remove from several at once
autoqai uninstall --client claude-code --client cursor

# Remove a project-scoped registration instead of user-scoped
autoqai uninstall --project

# Preview what would be removed without writing anything
autoqai uninstall --dry-run- It deletes only the
autoqaientry under each client's MCP server map and leaves every other server and setting in the file untouched. - If removing
autoqaileaves the server map empty, the now-empty key is removed too. A file with noautoqaientry is reported as no change. - This does not touch any project's
.autoqaifolder — delete that by hand if you also want to remove a project's runs, queue, and config. - Restart the affected agent(s) afterwards so they stop loading the AutoQAI server.
uninit and deinit are accepted as aliases for uninstall.
Pair a tab with your project
Once the package and extension are installed, the usual path is the shortest one: open your project in your AI agent. Because AutoQAI is already registered with your client, the agent starts the AutoQAI server on its own — there's no command to run first.
- Click the AutoQAI icon in your browser toolbar to open the popover.
- Under Discovered projects, find your running project — the popover scans your machine and lists it with its host and port already filled in. Click it.
- Paste the pairing token (ask your AI agent for the pairing token, or see it with
autoqai projects), then click Pair & connect. The project now appears as paired. You only paste the token the first time.
Pair from a terminal instead
You can also pair without your agent running — useful when you want a tab bound and ready before you start testing. Run autoqai with no arguments from a terminal in your project root to open the guided menu:
# From your project root, in a terminal
autoqai? What would you like to do?
Use ↑↓ to move, Enter to choose, Ctrl-C/Esc to go back.
> Register globally all agents, every project
Register in current project run from project root
Pair extension for this project
List configured projects
Exitautoqai in a real terminal opens the menu. When your AI agent launches it (without an interactive terminal) the same command runs the MCP server instead — so your agent integration is never affected. You can always force the server with autoqai serve.Choose Pair extension for this project from the menu (or run autoqai pair directly). If AutoQAI isn't registered with any client yet, it first offers to do that for you. It then starts the listener and prints the pairing details:
────────────────────────────────────────────────────────────
 AutoQAI — pairing details
 Project  checkout-web
 Port     7820
 Token    7K2Q9F

 Open the AutoQAI browser extension popover — this project
 should appear under "Discovered projects". Select it and
 paste the token above. If it isn't listed, add it manually
 with host 127.0.0.1, port 7820, and the token above.

 Paired ✓ — server running. Pair more tabs if you want.
 To use the AI features, stop this server and start your agent.
────────────────────────────────────────────────────────────
Pair it the same way: open the popover, pick the project under Discovered projects, and paste the pairing token from the banner.
127.0.0.1, the port (7820 by default), and the pairing token from the banner, then click Pair & connect.Ctrl-C), then start your agent — it launches its own AutoQAI server on the same project port, so the bound tab keeps working.Bind the tab to test
- Open and sign into the page you want the agent to drive.
- In the popover, pick the paired project and click Attach on the active tab.
- Give the binding a short label (e.g.
mainorcheckout) so the agent can target it.
Command-line tool
The autoqai command is both the MCP server your agent runs and a small toolkit for managing projects. Here's the full set of subcommands:
| Command | What it does |
|---|---|
autoqai | Open the guided menu (in a terminal). Run with no arguments from a terminal to open the interactive menu — register or unregister clients, pair the extension, and list projects. When AutoQAI is launched by an AI agent (without an interactive terminal) the same command runs the MCP server instead, so your agent integration is unaffected. |
autoqai menu | Open the guided menu explicitly. Always opens the interactive menu, even when output is piped. `setup` is an accepted alias. |
autoqai pair | Start the listener and pair a tab. Starts the loopback listener for the current project and waits for the browser extension to pair. The server stays running so the extension stays connected and you can pair more tabs; stop it (or press Ctrl-C) when you are ready to hand off to your agent. |
autoqai serve | Run the MCP server (no menu). Explicitly runs the MCP server plus the loopback WebSocket listener. This is what AI clients spawn. Use it when you want the server in a terminal without the guided menu. |
autoqai projects | List configured projects. Lists every project that has been assigned a port in the global registry, with the port and pairing token to use when binding it in the extension. Add `--json` for machine-readable output. `list` and `ls` are accepted aliases. |
autoqai init | Register with your AI clients. Writes the AutoQAI MCP registration into each supported client's config. On a clean machine this runs automatically the first time you install the package, so you usually only need it to add a client later. Target specific clients with `--client`, scope to the current project with `--project`, or preview with `--dry-run`. |
autoqai uninstall | Remove the registration. The exact reverse of `init` — removes only the `autoqai` entry from each client's MCP config. `uninit` and `deinit` are accepted aliases. |
Run the server directly
Most agents start the server for you once registered. To run it yourself — for example to watch the logs — use serve:
# Run the MCP server directly (no menu)
autoqai serve
Need a non-default port or a custom display name?
# Choose a different port and a friendly name
autoqai serve --port 7830 --project-name "Checkout web"autoqai a second time in the same project, AutoQAI detects the already-running server and shows you its port and token instead of starting a rival on a different port — so a bound tab never ends up stranded on a stale port.Give the agent project context
Each project keeps a PROJECT.md file the agent reads before every run. Use it to describe what the app is, where key screens live, and any rules the agent should know. You can edit it directly or from the dashboard's Project section.
# Project context

This app is an internal billing dashboard.

- Log in is handled by corporate SSO — assume the tab is
  already authenticated.
- The primary navigation lives in the left rail.
- "Invoices" is the most important screen to keep healthy.
- Currency is always shown in EUR with a trailing symbol.
A few sentences of context dramatically improves the quality of test plans and findings — it's the difference between an agent guessing and an agent that knows your app.
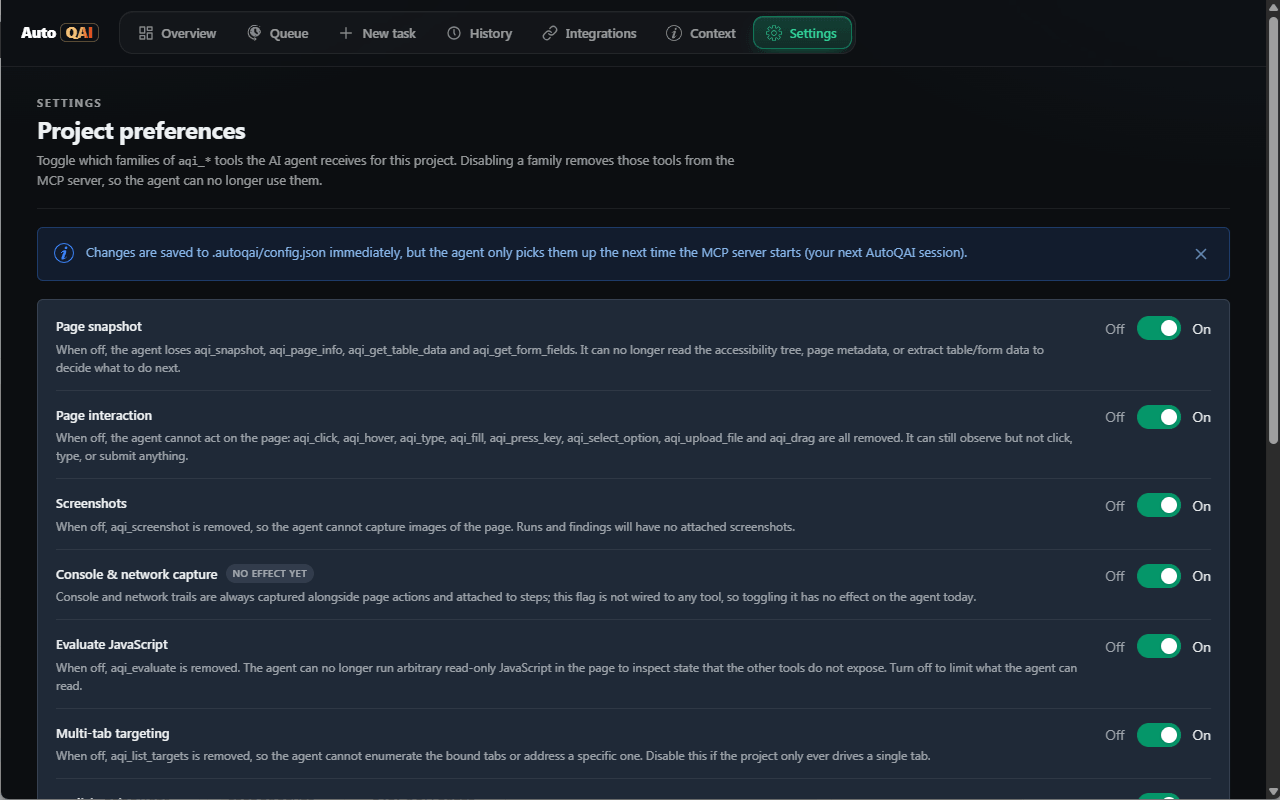
Configuration
Project configuration lives in .autoqai/config.json, created on first run. It records the port, the pairing token, which capability groups are enabled, and any integrations. You can edit it by hand or from the dashboard's Settings and Integrations sections.
{
  "projectId": "checkout-web",
  "projectName": "Checkout web",
  "port": 7820,
  "pairingToken": "7K2Q9F",
  "enabledTools": {
    "interact": true,
    "assertions": true,
    "comparison": true,
    "screenshot": true,
    "evaluate": true
  },
  "integrations": {
    "jira": { "baseUrl": "https://your-company.atlassian.net" }
  }
}
Turning capabilities on and off
The enabledTools block lets you scope what the agent is allowed to do — for example, disable page interaction during a read-only audit, or turn off comparisons when you don't need them. Settings changes apply to the running server immediately.
Environment variables
Settings can also come from the environment. Command-line flags override environment variables, which override the config file.
# .env  (optional — flags and config override these)
AUTOQAI_PORT=7820
AUTOQAI_HOST=127.0.0.1
AUTOQAI_PROJECT_NAME=Checkout web
AUTOQAI_LOG_LEVEL=info| Variable | Default | Purpose |
|---|---|---|
AUTOQAI_PORT | 7820 | WebSocket port the extension pairs to (auto-walks if busy). |
AUTOQAI_HOST | 127.0.0.1 | Bind address — loopback only. |
AUTOQAI_PROJECT_NAME | folder name | Friendly project name shown in the extension. |
AUTOQAI_LOG_LEVEL | info | Log verbosity (debug, info, warn, error, silent). |
Run a testing task
With a tab bound, queue a testing task from the dashboard's New testing task section — a short description, optional element selectors picked straight from the page, screenshots, and any linked tickets. Then ask your agent to start working:
Test the Invoices screen end to end:
create a new invoice, verify it appears in the list with the
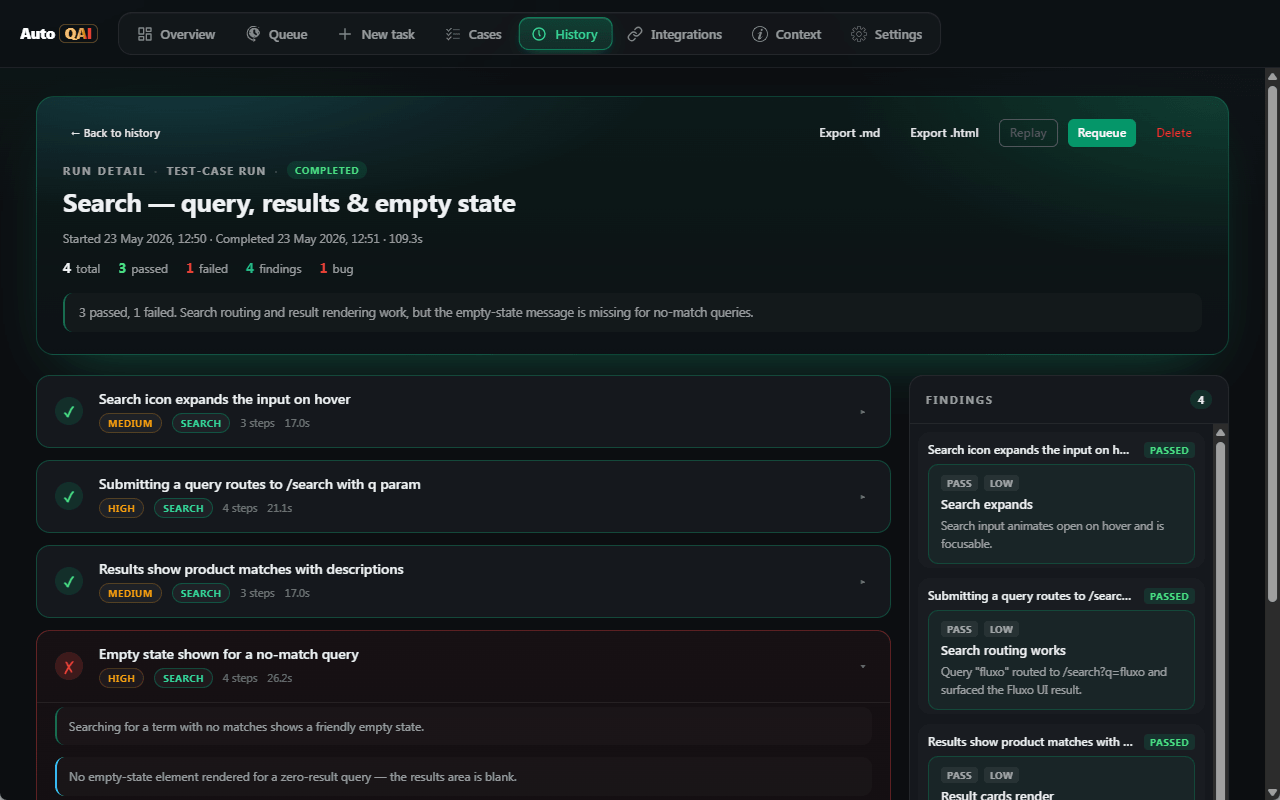
right total, then check the empty-state message after deleting it.The agent picks up the task and, in order:
- Drafts a plan of test cases you can see in the dashboard.
- Drives the page through your signed-in session, case by case.
- Runs assertions and records a finding for anything worth surfacing.
- Captures screenshots, console output, and network activity as evidence.
- Finalizes the run with an overall pass / fail summary.
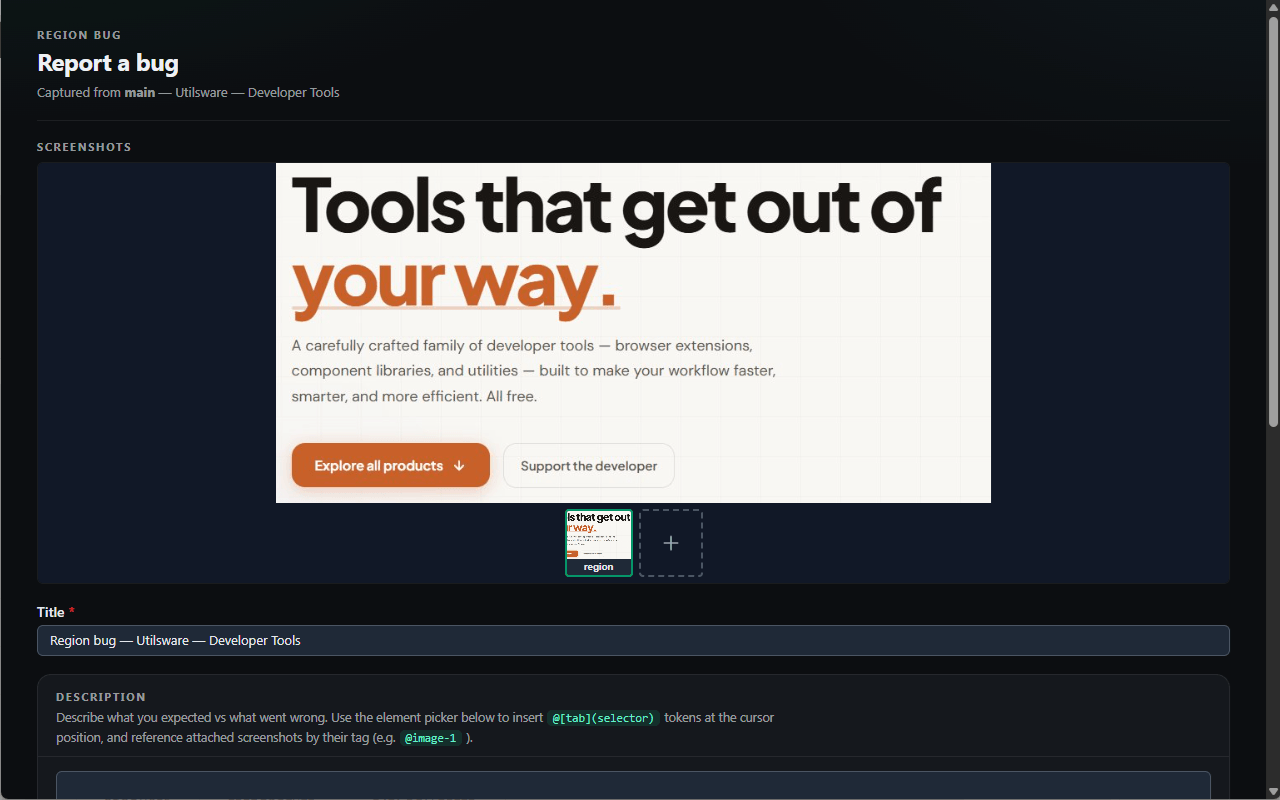
Report and fix a bug
When you hit a bug, open the dashboard's Bug report section and capture it straight from the page — current URL, a screenshot, the DOM snapshot, the selected element, plus the console and network trails. Queue it, then point your agent at it:
Reproduce the bug I just queued. It's about the
date filter on Reports resetting when you paginate. Confirm it,
find the cause, and verify your fix in the browser.
The agent reproduces the issue in the browser, uses your editor tools to find and fix the cause, and then validates the fix live before recording a finding — so you get a confirmed bug and a verified fix in one pass.
Compare two versions
For redesigns and regression sweeps, bind two tabs — say staging and production — and ask the agent to compare a surface across them:
Compare the Invoices table on this staging tab
against the production tab I also bound. Flag any row, column,
or formatting differences.
AutoQAI extracts each side and diffs it offline and deterministically, so no tokens are spent reasoning over raw rows or chart points. It can compare:
- Data tables — including merged cells and per-cell formatting
- Forms — labels, values, types, required state, and help text
- Charts — by series and data point
- Metric cards and labelled-value sections
- Computed styles, property by property
Differences are recorded as findings and rendered as a precise visual diff in the dashboard.
Build & run regression test cases
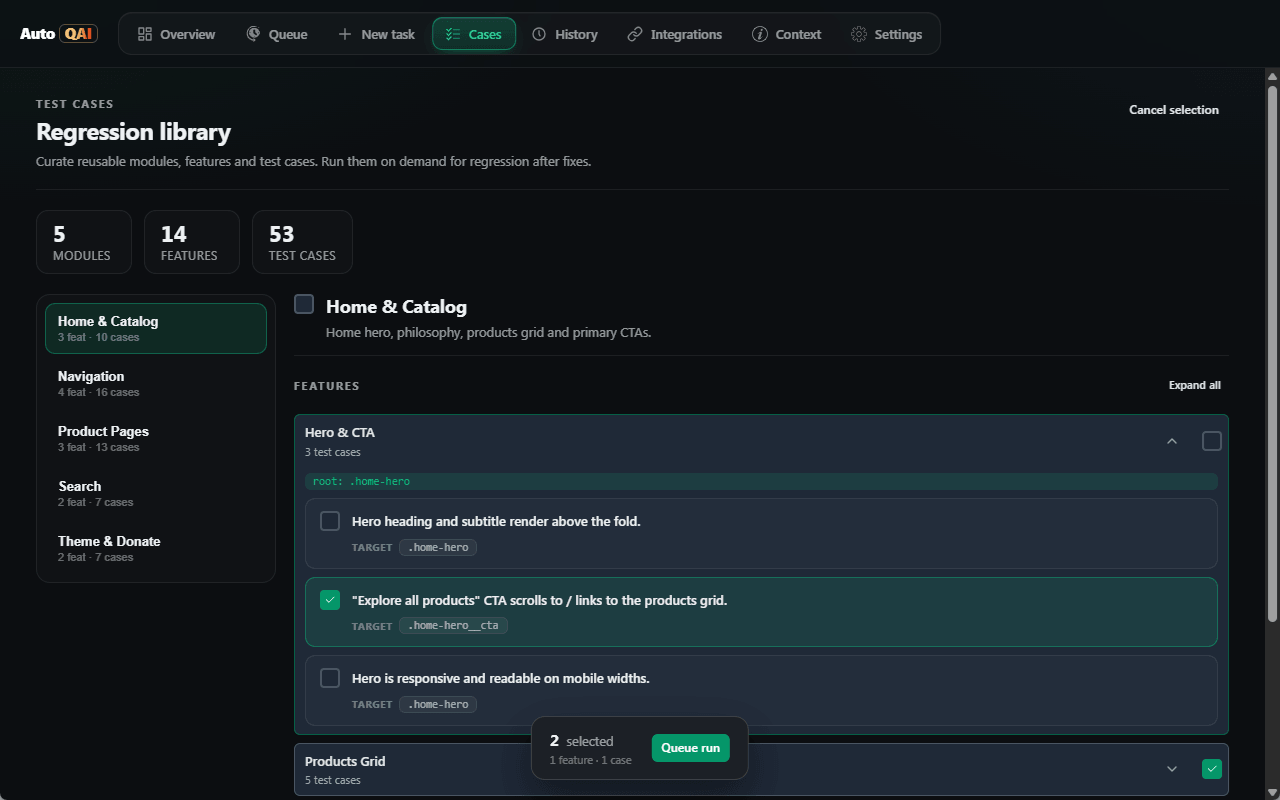
One-off testing tasks are great for ad-hoc checks, but the work you repeat after every change belongs in a regression library. The dashboard's Test cases section lets you curate reusable cases, organised the way your product actually works, and saved as tracked files in your repo so they review and version like code.
How a library is organised
- Module. The top-level grouping — usually an area of your product, such as Checkout or Authentication. Each module gets its own folder on disk.
- Feature. A set of related cases within a module — for example "Sign in with email". Each feature is one tracked file inside the module folder.
- Test case. A single thing to verify, written in plain language, with an optional element selector picked from the live page.
Author cases — by hand or with AI
- Author by hand — add modules and features, type each case in plain language, and pick selectors straight from the bound tab instead of typing them.
- Generate with AI — describe the area to cover and let the agent draft a starter library from your project context, optionally letting it look at the live screen for accuracy.
- Refine anytime — edit, add, or remove cases; updates are written back to the same tracked files, so the library lives in your repo and reviews like code.
Queue a run
When you're ready to verify, switch the section into selection mode, pick what to run, and queue it — then point your agent at the queue:
Run the regression test cases I just queued for the
Checkout module. Walk each case in the browser, mark it
passed or failed, and record a finding for anything that breaks.- Select any mix of whole modules, individual features, or single cases, then queue the selection as a run.
- Toggle Look at screen to let the agent capture page snapshots while it works through each case.
- The agent marks each case passed, failed, or skipped and records findings for anything that breaks.
- Results appear in the queue and history exactly like testing tasks and bug reports, grouped by case.
Because the library is stored under .autoqai/testcases and tracked in git, your whole team shares the same regression suite — and every run links its results back to the exact cases that produced them.
Jira integration
Point AutoQAI at your Jira instance and the agent can pull ticket details to test against the real acceptance criteria. Open the dashboard's Integrations section, enter your Jira base URL, and validate the connection.
- Requests are proxied through your own authenticated browser session — AutoQAI never sees or stores your Jira credentials.
- Once configured, the agent can fetch a ticket's description, status, assignee, comments, attachments, and linked issues.
- Link tickets to testing tasks and bug reports so the agent has the full context before it starts.
Privacy & security
AutoQAI is built to keep everything on your own machine.
- Loopback only. The server binds to 127.0.0.1 and refuses connections from any non-local address at connect time.
- Token-paired. The extension attaches only after you enter the one-time pairing token printed by the server.
- Your session stays yours. AutoQAI drives the tab you've already signed into; it never collects, stores, or transmits your credentials, cookies, or tokens.
- Local artifacts. Configuration, the project context, the task queue, and every run's test cases, steps, findings, and screenshots are written to the .autoqai folder in your project.
- No telemetry. There are no AutoQAI servers and no analytics — nothing phones home.
Troubleshooting
The agent doesn't see AutoQAI
Confirm the server is registered and that your agent has been restarted. Most agents have an MCP panel or command (such as /mcp) that lists connected servers. For IDE-integrated extensions (VS Code, Cursor, Kiro) you usually need to reload or restart the IDE window itself — not just the chat panel — so it picks up a newly registered server.
The extension won't pair
Make sure the server is running in the project and that the port and token in the popover match the terminal exactly. Run autoqai projects to confirm the project's current port and token. If the port was busy, AutoQAI may have moved to the next free one — check the latest pairing details.
The popover shows "disconnected" right after pairing
This happens if the server that captured the pairing has stopped. AutoQAI's pairing flow now keeps the server running after you pair, so the tab stays connected. Pair through the menu's "Pair extension for this project" (or autoqai pair) and leave it running; only stop it when you're ready to start your agent, which then takes over on the same port.
Pairing seemed to work but the project isn't listed
A project is added to the global registry the moment a tab binds. Run autoqai projects to confirm it's there with the expected port and token. If it's missing, re-pair and make sure the tab actually attached in the popover (the browser's "is being debugged" banner appears when it does).
Two terminals grabbed different ports for one project
AutoQAI keeps one server per project. The first running instance reserves the project's port and token; a second autoqai for the same folder detects it and shows the existing port and token instead of starting a rival. If you ever see a stale port, stop all AutoQAI instances for that project and start a single one again.
The tab isn't responding to commands
A bound tab shows the browser's "is being debugged" banner. If it's gone, re-attach the tab from the popover. Reloading the page is fine — the binding reconnects automatically.
My agent is on an old port after I re-paired
If you changed a project's port while the agent's MCP server was already running, restart the agent (or reload the IDE window for IDE-integrated clients) so it reconnects on the current port. With the one-server-per-project behavior this is rare, but it can happen if a server was started before the project had a reserved port.
Capabilities seem missing
Check the dashboard's Settings — capability groups can be toggled off. Re-enable the group you need and the change applies to the running server immediately.
The terminal is noisy with log lines
Server mode prints diagnostic logs to stderr; the guided menu and pairing flow suppress them for a clean interface. If you want quieter server logs, set AUTOQAI_LOG_LEVEL=warn (or error).
How-to & tips
Quick answers to the questions that come up most while getting set up.
I'm brand new — what's the fastest way to get going?
Install the package and the extension. On a clean machine the install step registers AutoQAI with every supported AI client for you, so there's nothing to configure. Then open the extension popover: your running project shows up under “Discovered projects” — click it and paste the pairing token once. If the install didn't auto-register (you already had AutoQAI set up before, or installed in CI), run `autoqai init` to do it manually.
How do I pair a tab without starting my whole agent?
Run `autoqai` and choose “Pair extension for this project” (or run `autoqai pair`). It starts the listener, shows the port and token, and keeps running so the extension stays connected while you pair one or more tabs. When you're done, choose “Stop server & return to menu” (or press Ctrl-C).
After pairing, how do I actually start testing?
Stop the pairing server, then open your AI client (Claude Code, Cursor, GitHub Copilot, or Kiro). Your agent launches its own AutoQAI server on the same project port, so the bound tab keeps working. The menu tells you which registered tool to start.
Do I have to restart my IDE after registering?
If the client was already running when you registered, yes — restart it so it picks up the new MCP server. For IDE-integrated extensions (VS Code, Cursor, Kiro) you usually need to reload or restart the IDE window itself, not just the chat panel. A standalone CLI like Claude Code just needs to be relaunched in the project.
I ran AutoQAI twice in the same project — which port wins?
AutoQAI keeps one server per project. The first running instance reserves the project's port and token; a second `autoqai` for the same folder detects it and shows the existing port and token instead of starting a rival server, so your bound tab never ends up on a stale port.
Where do I find a project's port and token again?
The extension popover scans your machine and lists every running project under “Discovered projects”, so the host and port are filled in for you — you only paste the token. To see a project's token, run `autoqai projects` (or pick “List configured projects” in the menu), or ask your AI agent for the pairing token in your editor. The popover also remembers projects you've paired before.
The extension isn't auto-discovering my project. What now?
Discovery looks for a project whose AutoQAI server is currently running in your editor or CLI, on the local port range. Make sure the server is running, then click Rescan in the popover. You can always add a project manually instead: enter host 127.0.0.1, the port from the server banner (or `autoqai projects`), and the pairing token, then click Pair & connect.
A new MCP version is on npm but my extension hasn't updated yet — what should I do?
Chrome Web Store reviews can take a couple of days, so a fresh MCP release can briefly run ahead of the extension version available in the store. Until the new extension is approved and auto-updates, install the older MCP version that matches the extension you currently have — for example `npm install -g @autoqai/mcp@0.1.0`. Once Chrome ships the new extension, switch back to the latest with `npm install -g @autoqai/mcp` (or `@latest`).
FAQ
How is this different from Playwright or a headless browser?
Headless tools launch a brand-new, empty browser — so you have to script logins, seed sessions, and recreate state before any real test can run. AutoQAI drives the browser you already have open and signed in. Your cookies, SSO, and feature flags are live, so the agent tests the application exactly as it behaves for a real, authenticated user.
Which AI agents does it work with?
AutoQAI works with any MCP-capable CLI agent. It can auto-register itself with Claude Code, Cursor, GitHub Copilot (agent mode in VS Code), and Kiro using a single init command, and it works with any other client that supports MCP servers over stdio.
Does my data or my page content leave my machine?
No. The MCP server and the extension communicate over a loopback-only WebSocket (127.0.0.1) protected by a pairing token. Connections from any non-loopback address are refused. Test runs, findings, and screenshots are written to plain files inside your project folder.
Can the agent control any tab without my permission?
No. You explicitly pair a project and bind a specific tab from the extension. The browser shows its standard debugging indicator while a tab is bound, and you can unbind at any time.
What can the agent actually do on the page?
It can inspect the DOM and accessibility tree, click, type, fill, hover, drag, select options, upload files, press keys, wait for elements or network idle, run assertions, capture screenshots, and extract and compare structured content like tables, forms, and charts.
Is it really free?
Yes. AutoQAI is free to use. The MCP server is published on npm and the extension is available from the Chrome Web Store.
Can it test more than one tab at once?
Yes. Each bound tab gets its own connection, so an agent can drive several tabs in parallel — useful for multi-window flows or comparing two environments side by side. And while the agent is driving a tab, any new tab that action opens (a link in a new tab, a popup, an OAuth screen) is bound to the same project automatically, so the agent can keep going without you binding it by hand.
Where are my test runs and findings stored?
Inside your project, under a local .autoqai folder. Configuration, the project context file, the task queue, and every run's test cases, steps, findings, and screenshots are kept there as JSON, Markdown, and image files you fully own.
Can I save reusable test cases for regression testing?
Yes. The dashboard's Test cases section lets you build a regression library organised as Modules, Features, and individual cases — each saved as a tracked file in your repo. You can author cases by hand (picking selectors straight from the page) or have the agent draft a starter library, then queue any selection for the agent to run, getting a passed / failed / skipped result per case.
How do I remove AutoQAI from my agent?
Run autoqai uninstall to reverse the init command — it removes only the autoqai entry from each client's MCP config and leaves everything else untouched. Target specific clients with --client, scope it to a project with --project, or preview with --dry-run. Your project's .autoqai folder is never touched, so delete that by hand if you also want to remove a project's runs and queue.
Is there an easy way to set up without remembering commands?
Yes. Run autoqai with no arguments in a terminal and it opens a guided menu that walks you through registering it with your AI client, pairing the extension, and listing your projects. When your agent launches the same command (without an interactive terminal) it runs the MCP server instead, so the integration is never affected.
After I pair, why does the server keep running?
Pairing is a live connection, so the pairing flow keeps the server running to keep the extension connected — and lets you pair more tabs. When you're ready to use the AI features, stop it (or press Ctrl-C) and start your agent, which launches its own AutoQAI server on the same project port so the bound tab keeps working.
Do I need to restart my IDE after setup?
If your AI client was already running when you registered AutoQAI, restart it so it loads the new MCP server. For IDE-integrated extensions (VS Code, Cursor, Kiro) that usually means reloading or restarting the IDE window itself, not just the chat panel. A standalone CLI like Claude Code just needs to be relaunched in the project.